Show summary Hide summary
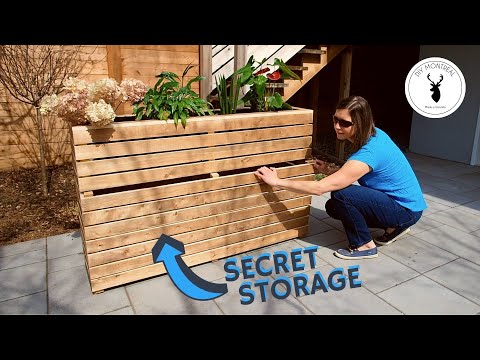
Transforming a narrow patio into a tidy, productive garden can be as simple as building a raised planter that hides storage. This compact project lifts plants to a comfortable working height while tucking hoses, tools, and watering cans out of sight. With common fence boards, a few basic tools, and a little elbow grease, you can create a multipurpose planter that looks polished and solves clutter at once.
Why choose an elevated planter with hidden storage
Michaels holiday finds under $25: 20 new gifts that look like $50
Target wall-mounted find frees up countertop space: timeless style for small kitchens
An elevated planter makes planting and maintenance easier. It reduces bending and keeps soil contained. Adding a concealed compartment turns the planter into a small shed alternative.
- Comfort: Plants sit at a convenient height for planting and pruning.
- Organization: Tools and supplies stay nearby, clean, and protected from weather.
- Space efficiency: The slim profile fits balconies and tight patios.
What materials and dimensions to plan for
Use exterior-grade fence boards or other weather-resistant lumber. Treat or seal reused wood before assembly to extend life. Decide dimensions based on where the planter will sit and what containers you’ll use inside.
- Lumber: fence boards for panels, 2x2s or similar for vertical supports.
- Fasteners: exterior screws and optionally wood glue for strength.
- Hardware: rare-earth magnets or simple latches for the access door.
- Planter inserts: two plastic flower boxes or liner trays work well.
For a useful reference size, aim for roughly 2 feet 9 inches tall, about 4 feet 4 inches wide, and around 1 foot deep. That height keeps plants at a good working level. Two 24-inch-long plastic planters fit comfortably inside that footprint.
Step-by-step build: from boards to finished planter
Cut and assemble the outer box
Measure and cut four long planks for the front, back, and two ends. Leave small spacers if you want a slatted look. Secure vertical support pieces on each corner and add a center support along the front and back for stiffness.
Create the internal shelf for planter boxes
Screw short ledger boards inside the long sides to form a ledge. Place the planter trays on this shelf. Make the shelf adjustable by adding screw-on cleats if you want to swap box sizes later.
Cut the access opening and hinge the door
Design the front panel so a lower portion becomes a door. Cut carefully and mount it with hinges or use a removable panel. Install magnets or a simple latch to keep the door closed.
- Lay out planks and attach corner supports with clamps.
- Join panels together to form a rectangular shell.
- Add internal shelf boards for planter trays.
- Cut and attach the access door on the front face.
- Fit the top edge with horizontal trim for a finished look.
Storage solutions and small upgrades
Inside the compartment, add features that keep gardening tidy and useful. Hooks, bins, or sliding trays make finding tools fast. Magnetic catches hold the door flush while a simple handle improves access.

- Install hooks for trowels and hand tools.
- Add small pull-out drawers or stackable bins for seed packets and gloves.
- Place a shallow shelf at the bottom for a watering can or sprayer.
Finishing touches to boost longevity and style
Seal the wood with an outdoor-grade finish, especially if you used reclaimed boards. Sand rough edges and round corners for a refined appearance. Add a weatherproof liner inside the planter trays to protect the wood from constant moisture.
Stain or paint the exterior for a cohesive look that matches your outdoor space. Horizontal trim boards around the rim conceal cut edges and give the planter a custom furniture feel. Small design choices make a big difference in curb appeal.
Quick tips for a smoother build and better results
- Pre-drill screw holes to prevent board splitting.
- Clamp parts during assembly for square corners and accurate gaps.
- Test-fit planter trays and tools before final fastening.
- Consider leveling feet if your patio surface is uneven.
- Use galvanized or stainless fasteners to resist rust.